Overview
Learning about Networks, SSH, SFTP and Putty.
NOTE: Putty is tool for Windows. Since we use Lubuntu it is no longer necessary for my students to learn about Putty. On Lubuntu we use commands that begin with the letters ssh such as ssh-add and ssh-keygen. So you should focus your attention on those sections when reading this document.
The ability to communicate securely across a network is a fundamental building block for those seeking expertise in Cloud computing. SSH is protocol that supports very secure communication both for remote command line sessions and for the Secure File Transfer Protocol (SFTP).
As a general rule SSH is part of the Unix world and not part of the Windows world. Linux boxes come with SSH already installed or easily installable, and Windows boxes have no understanding of the protocol. To add SSH to Windows most people use a free tool called Putty, which is explained in this document. To add SFTP to Windows and Linux, you can use a tool called FileZilla. You can use FileZilla on Windows, or you can use Putty. For a relatively small fee, you can also use an excellent tool called Beyond Compare. More details on SFTP clients are available here:
Linux users can follow this link to learn how to set up SSH, and then return to this document to learn more.
Pinging a Machine
Sometimes you might try to use SSH, SFTP or HTTP to communicate with a machine and get an error. There could be many probable causes for receiving an error when attempting to use one of these protocols. It is usually best, however, to start at the beginning and determine whether the machine with which you want to communicate is running and signed into the network. One way to test if a machine is available on the network is to go to the command prompt and try to ping it. If it works, the session should look something like this:
C:\Users\Charlie>ping 192.168.0.123

Pinging 192.168.0.123 with 32 bytes of data:
Reply from 192.168.0.123: bytes=32 time<1ms TTL=64
Reply from 192.168.0.123: bytes=32 time<1ms TTL=64
Reply from 192.168.0.123: bytes=32 time<1ms TTL=64
Reply from 192.168.0.123: bytes=32 time<1ms TTL=64
Ping statistics for 192.168.0.123:
Packets: Sent = 4, Received = 4, Lost = 0 (0% loss),
Approximate round trip times in milliseconds:
Minimum = 0ms, Maximum = 0ms, Average = 0ms

C:\Users\Charlie>
On Windows, a session with PING ends by default after four iterations. On Linux, however, the process of ping a machine will continue indefinitely. To break out of the loop, press Ctrl-C.
When an attempt to ping a machine fails, your session might look like this:
C:\Users\Charlie>ping 192.168.0.167
Pinging 192.168.0.167 with 32 bytes of data:
Reply from 192.168.0.101: Destination host unreachable.
Reply from 192.168.0.101: Destination host unreachable.
Reply from 192.168.0.101: Destination host unreachable.
Reply from 192.168.0.101: Destination host unreachable.
Ping statistics for 192.168.0.167:
Packets: Sent = 4, Received = 4, Lost = 0 (0% loss),
C:\Users\Charlie>
Sometimes an admin for a machine will close down the service that responds to pings, and hence a machine won’t respond even though it is running and on the network. However, as a general rule, if ping doesn’t work, then either the machine isn’t running, or else the network isn’t set up right. (Or you might have the wrong address for the machine.)
If the ping succeeds but you can’t browse or SSH to the machine you pinged, then that often means that the machine does not have ports 80 and 22 open.
Pinging a machine is meant to be a way of asking the question: “Are you alive? Are you running?”
Why SSH?
SSH is a means of establishing identity on the web. If we are in the same room, I know who you are by looking at your face. If we talk on the phone, I can know who you are by recognizing your voice. Identity can also be established by a signature, or by asking a question that only certain people can answer can answer. None of these things work very well over the web, particularly when we are trying to prove our identity to an abstract entity such as a web site. Furthermore, over the web, we have to be able to transmit data in encrypted form so others can’t see it.
SSH is designed as a means of proving our identity and encrypting data in the most secure and reliable manner possible. This is accomplished by means of creating a mathematically unique public/private key pair. We keep the private key, we give the public key to others. If our private key matches the public key we gave to others, then we have proved our identity. It’s a bit like having two keys to a safety deposit box, both of which are needed to open the box. The bank has one key, we have the other. The box can’t be opened unless both keys are present. Or, more simply, matching a public/private key is like recognizing a face or a voice: it is a means of establishing identity.
The public can be used to encrypt data while the private key can be used to decrypt data. Given a public key, it should be – and in fact is with today’s computers – impossible to derive the private key. We don’t necessarily encrypt an entire file using RSA encryption. Instead, we encrypt a session key. Session keys are an implementation detail not discussed in here. For more details you can start with the amazing stack exchange Security article found here
We create an SSH key pair like this:
ssh-keygen -t rsa -P '' -f ~/.ssh/id_rsa
At runtime, it looks like this:
Generating public/private rsa key pair.
Your identification has been saved in id_rsa.
Your public key has been saved in id_rsa.pub.
The key fingerprint is:
SHA256:3C9oYoNjl/lfvQl/zHKHCUcIy75xUPVutRfhBlEmdhM charlie@rohan-elf
The key's randomart image is:
+---[RSA 2048]----+
|             *+E.|
|          . o *.o|
|         . + . +o|
|       . .+ . o.+|
|        S... . .+|
|     . o .o.o....|
|    + B o .++o.= |
|   . + =  .o o+o*|
|        ...   ++.|
+----[SHA256]-----+
This generates two files that might have names like this:
- id_rsa // The private key
- id_rsa.pub // The public key
We hang onto the private key. We are the only ones who should ever have access to this key.
We give the public key to others when we want to be able to prove to them who we are. For instance, we might give a copy of our public key to GitHub or BitBucket. They associate this key with our account. Then we use SSH to help us match keys and prove our identity, prove that we are the owner of a particular account. Then we can access the resources associated with that account.
We are the only ones who have access to the private key, so when SSH matches our private key to a public key we have proved that we are who we say we are. The matching of our private key to a public key proves our identity.
NOTE: We frequently use public/private keys when we want to store something of ours with a third party. This is like putting money in a bank. The bank holds our money, and it gives us access to it when we prove who we are. GitHub stores our code, and gives us access to it when we prove who we are. In some cases, of course, the code on GitHub is free for everyone to view, but you need to prove who you are with SSH if you want to read-write access to it. Everyone has read access, but only those with special permission have read-write access.
Before we can use a private key, we generally have to load it. To load our private key, we can use a tools called ssh-add:
$ ssh-add id_rsa
Identity added: id_rsa (id_rsa)
No we are now ready to use SSH to contact a site and establish our identity on that site.
To recap, we have done three things in order to have a means of establishing our identity:
- Generated a key pair
- Loaded the private key locally
- Given the public key to a remote site that we want to access
The remote site will now allow us to access resources, such as a Git repository. Why? Because they can match our private key to the public key we gave them. We are the only ones who have the private key, so we must be who we say we are.
Now, suppose you copied your private key to another machine. Then you could load that private key on that machine and access your GitHub or BitBucket repository from that machine.
In fact, if you gave your private key to everyone in the world, then they too, at least in theory, could access your repository. But that would not be a very sensible thing to do.
At this point it should be fairly obvious that one could also use this strategy:
- Create a public private key pair on Machine A and put the public key on GitHub. Now Machine A can access your GitHub repository.
- Create a public private key pair on Machine B and put the public key on GitHub. Now Machine B can access your GitHub repository.
In other words, whether you copy the private key from Machine A to Machine B, or whether you create a new public/private key pair for each machine is a personal choice. Both strategies work. Which one you choose is up to you.
And here is one final piece of the puzzle. In our class, I ask each of you to give me permission to access your repository. But I don’t have your private key. How come I can access your repository? The answer is that I have my own private and public key, and my public key is associated with my account. I can use my key pair to prove I’m really me, and you have given me access to your repository.
NOTE: When you give me access to your repository, what you are really saying is this: “Give the owner of this account access to my repository.” I then use my public private key to prove that I am the owner of that account, and therefore I can access your repository. It’s all about establishing identity. I use SSH and a key pair to prove I’m who I say I am. After that, everything is easy.
When you give someone else access to your account, what you are really saying is this:
- I trust this person
- I trust that he can safeguard his private key.
If I was untrustworthy, or if I was careless with my private key, then it would not be a good idea to give me access to your repository.
A final, more or less off topic note. If you think about what is going on here, you can see why an employee’s integrity is one of their most sacred and valuable assets. If a company hires one of us, they are going to end up giving us access to valuable resources, and in particular, they are often going to trust us to use and safeguard our SSH keys. Obviously no company will ever want to hire someone they feel they cannot trust to be both honest and reliable in such matters. This is why people who cheat or who are chronically careless are playing a fool’s game. If they are discovered cheating even once, then the gig is up. No one will want to hire them. Dishonesty is the classic example of risking short term, small gain for a long term, huge loss. Carelessness is easier to forgive, but it is hardly a trait that companies concerned about security actively pursue.
SSH, SSL and HTTPS are related technologies. In particular, SSH and HTTPS do very similar things in similar, but not identical, ways. There are implementation details on which they differ, but these details are not usually important to most developers. For our purposes, it is perhaps a useful oversimplification to simply say that HTTPS does for web sites and some other tools what SSH does for Linux users: they both provide a secure means of data transport and personal identification. They both use similar complex mathematical algorithms to create this security.
Another type of security tool is an SHA algorithm. They are not used to encrypt today or establish identity. Instead they are used to uniquely identify a particular file, they are used to prove that the file you downloaded is in fact the file you wanted to download. If you wanted to download the WebStorm zip file, then you can use SHA to prove that the file you downloaded is identical to the file made by the creators of Webstorm.
Learn more about SSH, SSL and SHA encryption:
Password Protect Private Key
Unless you are using LastPass or some other tool where you can store passwords, I don’t recommend putting a password on your private keys. But if you think you are organized enough to do this kind of thing, then you can password protect your private key like this:
ssh-keygen -p -f ~/.ssh/id_dsa
NOTE: In LastPass there is a Secure Notes area where you can save random bits of data like SSH private keys.
SSH Basics
SSH stands for Secure Shell. There are two common scenarios for using SSH:
- You want to gain access to a remote service such GitHub, LaunchPad or BitBucket
- You want to open up a command line interface to a remote instance of an operating system. In most cases, the remote server will be a Linux or Mac box.
SSH provides a secure means of communication between your local client machine and remote server. The authentication between the two machines is usually handled as follows:
- On the client, you load a private SSH key into memory.
- You provide the server with a public key that matches your private key.
- When you connect, the private and public keys are compared. If they match, a connection is established.
Below you will find a description of how to create a public/private key pair, and how to configure the client and server so that the keys can be matched and a connection established.
SSH clients are found on Linux, Mac and Windows. SSH servers are typically found on Linux or Mac boxes. A rough example of a Windows equivalent to an SSH client/server is Remote Desktop. The primary difference between Remote Desktop and SSH is that Remote Desktop gives you access to Windows machines, while SSH gives you access to a wide range of services distributed across the Internet. In other words, Remote Desktop if a proprietary Windows service, and SSH is an open standard implemented across a range of platforms.
On Desktop machines, Windows is still the dominant operating system. Therefore, Remote Desktop is a very important protocol in most IT organizations. On the Internet, however, most machines are some variant of Linux, and many of the client machines are Macs. As a result, web developers and folks who want to interact with the cloud need to know SSH.
Here is a nice overview of the topic from our friends at Wikipedia:
http://en.wikipedia.org/wiki/Secure_Shell
If you haven’t already done so, follow this link to learn how to set up SSH on Linux or the Mac:
SSH Between Machines with Authorized Keys
This section is aimed at Linux and Mac users. If you use Windows, look below for the section on Putty. It assumes that you have SSH installed. On Ubuntu, install SSH like this:
sudo apt-get install ssh
Issue these commands to generate a key pair and copy the public key part into your authorized keysfile:
	cd
	ssh-keygen -t rsa -P '' -f ~/.ssh/id_rsa
	cat ~/.ssh/id_rsa.pub >> ~/.ssh/authorized_keys
The code starts by moving you to your home directory with the cd command. After issuing the ssh-keygen command you will have a private key and matching public key. The private key is called id_rsa and the public key is id_rsa.pub. The last line ensures that a copy of the public key was also placed in a file called ~/.ssh/authorized_keys. As you can see, this file is located in a directory called .ssh.
This is so important that I will repeat it in slightly different form:
- ssh-keygen ensured that you have a private key and public key on your current machine. In this case they are called id_rsa and id_rsa.pub,where the latter is the public key.
- The command to cat id_rsa.pub into authorized keys ensured that your machine also has a copy of your public key in its authorized keys file. Theauthorized_keysfile lists the public keys for the machines that are allowed to visit it via SSH without having to type a password. It is this private key, public key pair that makes SSH without passwords possible.
And place this at the bottom of your .bashrc file:
if [ -z "$SSH_AUTH_SOCK" ] ; then
    eval `ssh-agent`
fi
Now restart your shell. Not the whole machine, just the terminal window. Alternatively, you can force the OS to process your updated .bashrc by using the source command:
source ~/.bashrc
Now load the key:
ssh-add ~/.ssh/id_rsa
If all goes well you should see a message with the words Identity added in it. You are now ready to SSH to remote machine, or use Git or other tools to copy files to a remote server.
SSH Script
This script is not that useful, but it does help spell out the details off what you can do with ssh-keygen:
#! /bin/bash

KEY_NAME=Test-Key
SSH_DIR=$HOME/.ssh
FULL_PATH=$SSH_DIR/$KEY_NAME
PUBLIC_KEY=$FULL_PATH.pub
AUTHORIZED_KEY_FILE=$SSH_DIR/authorized_keys_test

cd $HOME
pwd
echo $FULL_PATH

function setupKey() {
	# -t: Type of key
	# -P: Passphrase which is initially empty
	# -f: The file name of the key to create
	# -v: Describe what you are doing
	ssh-keygen -v -t rsa -P '' -f $FULL_PATH
	cat $PUBLIC_KEY >> $AUTHORIZED_KEY_FILE

	# Change the passphrase
	ssh-keygen -p -f $FULL_PATH
}

function removeKey() {
	rm -v $FULL_PATH
	rm -v $PUBLIC_KEY
	rm -v $AUTHORIZED_KEY_FILE
}

# removeKey
setupKey
More on Using SSH to Access Another Machine
You can now SSH into your own localhost machine without being prompted for a password. To SSH to another machine you must copy your public key to that machine. But you need do nothing else to SSH into your own machine. Granted, there is not much utility in SSHing into your own machine, but it is a good exercise to help you see if everything is set up right. It might look a bit like this in practice, where the first line is the command you give to start the SSH session:
$ ssh localhost
The authenticity of host 'localhost (127.0.0.1)' can't be established.
ECDSA key fingerprint is 2b:33:64:c1:42:f9:08:42:f6:d3:4e:7e:92:14:32:d4.
Are you sure you want to continue connecting (yes/no)? yes
Warning: Permanently added 'localhost' (ECDSA) to the list of known hosts.
Welcome to Linux Mint 12 Lisa (GNU/Linux 3.0.0-12-generic i686)

Welcome to Linux Mint
 * Documentation:  http://www.linuxmint.com
Note that the above session includes text establishing the identity of a key fingerprint. This will occur the first time you SSH into a machine, even if it is localhost. You should, however, see this only one time. If you see it more than once, then someone might be trying to fool you into signing into a “honeypot” or fake machine designed to fool you into giving away some of your private information. (This is in fact an unlikely scenario, but it is not impossible.)
The odd thing about this example is that we enabling ourselves to SSH into the current machine. To exit the “remote” session to your local machine, type exit. Now we are ready to SSH to a remote machine.
Here is a command that will enable you to copy your public key to another machine on the network. After issuing this command you should be able to SSH to a machine called BoxPrimary as user hadooper without having to type a password:
ssh-copy-id -i $HOME/.ssh/id_rsa.pub hadooper@BoxPrimary
This command appends your key to the authorized_keys file of a remote machine. After copying the key to the remote machine, you should be able to SSH to that remote machine:
ssh <URL OR IP OF REMOTE MACHINE>
For instance:
ssh 192.168.2.23
For help setting up SSH, see the script called setupSsh.sh, as explained at the end of this document.
SSH Config
So here are a few words on the ~/.ssh/config file which can help you use SSH with less hastle.
To ssh directly to an EC2 ubuntu server, I put this in the config file:
Host ubuntu
	HostName 54.XXX.XXX.XXX
	Port 22
	User ubuntu
	IdentityFile ~/.ssh/ISIT320-01.pem
In this example, 54.XXX.XXX.XXX is the IP address of the EC2 server. It would also be the name of a site, such as mysite.com. After saving my config file, I can access the site by just typing this:
ssh ubuntu
To use Git to access a repository, I create a second entry in the ./ssh/config file that looks like this:
Host bitbucket.org
    IdentityFile ~/.ssh/ISIT320-01.pem
Now I don’t need to worry about calling ssh-add. The key is loaded automatically whenever I access the bitbucket.org with git.
In its entirety, a config file might look like this:
Host ubuntu
    HostName 54.172.9.41
    Port 22
    User ubuntu
    IdentityFile ~/.ssh/ISIT320-01.pem

Host bitbucket.org
    IdentityFile ~/.ssh/ISIT320-01.pem

Host github.com
    IdentityFile ~/.ssh/github.key
You don’t need to call chmod and set the privileges for the file. Just an ordinary text file created with a text editor like Geany, Vim, nano or gedit will work.
Load key once
Or, you could do this to avoid adding a key multiple times put this code in your .bashrc:
ssh-add -l | grep -q "made on rohan-elf"
if [ $? -eq 0 ]; then
    echo OK
else
    echo FAIL
    ssh-add ~/.ssh/id_rsa
fi
To set up the above, first load your key. If you then run ssh-add -l you will see a list of loaded keys. Grab part of it what you see for the key you want in the grep statement above:
grep -q “
For instance, maybe the comment at the end of your public file could go there. I think.
Then, load your key in the next to last line. It may or may not be called id_rsa.
Now one and only one key should be loaded automatically when you open a bash shell.
Using Putty
Putty is a Windows client for SSH. It is free, open source and provides you with a range of easy to use tools. Here is the link to a well known location where you can download Putty:
http://www.chiark.greenend.org.uk/~sgtatham/putty/
You can either download a compressed folder containing the files or download the Windows installer. In most cases, it you will be happiest if you run the Windows installer. If you prefer to download the compressed folder, you can just unzip it, and then run the various programs found inside it. However, I would unzip the folder to a location on your home drive rather than trying to run it off a slow USB drive.
Connecting to an SSH Server with Putty
The simplest way to use Putty is to open up the GUI client, enter the address of a machine that has an SSH server, then click the Open button. If you know the name and password for a user of the machine, then you should be able to sign in to that machine.

Figure 01: The simplest possible way to use Putty. Specify the address in the Host Name field, and press the Open button. A window will open, use it to fill in your user name and password.
Though the process outlined above is simple, it is not the easiest way to use Putty. To make the process simpler, you will need to:
- Name and save the entry for your server. (See the Saved Sessions in Figure01)
- Specify a user name
- Create a public and private key
To use Putty properly, you can start with the steps shown in Figure 1. Then you should give a name to your session and press the Save button.

Figure 02: In this screen shot you can see that the session has been saved under the name NorthSea
Next, click on the Data field in the Category window and enter your user name on the server.

Figure 03: Enter a username, then click on Session once again, and save your work. (If you are signing into an EC2 Ubuntu instance, the username is set, by default, to ubuntu. So in that case, don’t write your own name, write ubuntu.)
After saving a session that contains a user name, you can click the open button, or double click on your session name, and open your SSH window. This time your user name is supplied automatically, and you only need to enter a password. I often use Putty in this mode, but it gets tiring having to type in the password each time.
If you take one more step and learn about public and private keys, then you are on your way to becoming the master of Putty in particular and SSH in general.
Creating Key Pairs with PuttyGen
NOTE: If you have downloaded a PEM key from AWS EC2, then you should skip ahead to the section on**converting PEM files into PPK files**. After reading that section you should should skip ahead to the section on Loading a Private Key with Pageant. If you are not using a PEM file, continue reading to learn how to create a public/private key pair with PuttyGen. The key point to grasp is the following: Normally you would use would use PuttyGen to create a public/private key pair. However. If you downloaded a PEM private key from someplace like EC2, then all you need to do is convert the PEM file into a Putty PPK file.
Putty comes with an easy to use tool called PuttyGen that allows you to generate a public/private key pair. You can also use PuttyGen as a simple way to view the public key associated with a particular private key.
The private key you keep on your client machine and you show to no one. The public key you put on one or more servers in a file called authorized_keys that is stored in the user’s home directory in a folder called .ssh:
/home/someUserName/.ssh/authorized_keys
The same folder is also commonly written like this:
~/.ssh/authorized_keys
To create a public/private key first open PuttyGen and select Key | SSH-2 RSA Key from the menu. Click the Generate button and move the mouse around a bit.

Figure 04: Generating a public private key pair with PuttyGen

Figure 05: PuttyGen as it looks after you have generated a public and private key pair.
You can, and perhaps should, associate password (passphrase) with your key. Once you have done so, you should save the private key to a well known location on your system, and optionally save the public key. Saving the public key is optional since you can always view it by loading your private key. In Figure 05, you can see the Public key in the top of the window.
Once you have create your key pair, you should copy the Public key into your clipboard (key buffer). Now you should open a command prompt on your server, and paste your key into theauthorized_keysfile. There is a bit of a chick and the egg problem here in some cases, but one solution is to use Putty to open the command window, then load or create the authorized keys file with the Nano editor, and finally right click to paste the key from the clipboard into your file. If you are running your Linux box in a VM, then there might be other ways for you to copy the key into the appropriate file.

Figure 06: Pasting the public key into the authorized keys file. Click to expand.
You can use pscp, the Putty Secure Copy command to copy a file to a remote machine. Suppose you have a connection in Putty that you have named MyConnection. First back up your authorized_keys file; the command I’m about to show you will overwrite your authorized_keys file if it exists. Make sure the Putty utility called pscp is on the path, and then write the following at the command line, where charlie is your user name on the Linux system:
pscp MyPublicKey.ppk charlie@MyConnection:.ssh/authorized_keys
For more information, see the section below called Secure Copy with PSCP.
As a general rule, you want the authorized keys file to be readable and writable only by the owner, so you might give it 600 permissions:
~/.ssh $ chmod 600 authorized_keys
~/.ssh $ stat -c "%A %a %n" authorized_keys
-rw------- 600 authorized_keys
You have now completed the process of creating a private/public key pair. Since you are probably not using a PEM file, and since you already have your Putty private key, you should skip the next section on PEM files, and go directly to the section on Loading a Private key with Pageant.
Convert a PEM File to a Putty PPK File
This section describes how to convert a PEM file from a source like EC2 into a Putty private key (PPK). If you are not working with PEM files, you should skip this section and go to the section on Loading a Private Key with Pageant.
A PEM file is a private key, but it is not in the format that Putty expects. PEM files are generated by some SSH tools, notably the one used on AWS. Since the format is different than that found in a Putty PPK file, you need to convert it before you can use it with Putty.
Launch PuttyGen if it is not already running. Choose Conversions from the menu and browse to the PEM file that you saved. After you import the key, simple save the file as a Putty PPK file by selecting Save private key. (Do not push the Generate button.) You will be prompted for a password if you did not supply, but you can choose to ignore that.
NOTE: Do not press the Generate button after you use the Conversions menu. Your key was already generated on EC2. (Or possibly it was generated on some other system, such as a local Linux box.) You do not, and should not, generate the key. You are just converting the key. After you convert it by using the menu item, you should simple press theSave private key button. Don’t press the Generate button!

Figure 09: Converting the PEM file to a PPK file.
After you have converted the PEM file to PPK, you should launch the Putty tool called Pagaent, and load your PPK into it. See Figure 7 above for a screen shot of the Pagaent tool. As you can see from the screen shot, you need to select the Add Keybutton and add the key to Pagaent. Figure 7 shows two different keys loaded, but you need only load the one to access your EC2 instance. Also, see Figure 08 for a means of making Putty explicitly aware of your PPK key. Be sure you have also set the auto-login usernamein the Data dialog, as shown in Figure 3. If you are trying to log into an EC2 instance, the default user name is ubuntu. In general, you should make sure you complete all the steps Using Putty section found above, except for the section on generating a PPK file. You have already done that.
Though you aren’t quite ready yet to connect with Putty, still it might be useful to see what it will look like when you do. In Figure 10 you can see an example of what the EC2 SSH Shell looks like just after you sign in with PuTTY. In this screen shot, the user has already filed in all the fields of the Putty dialog and clicked connect. As the connection takes place, a window opens that shows the text from a Linux shell. You are placed at the command prompt for the shell, and can begin issuing commands to configure Linux, or to move and copy files. Again, don’t try to do this yet, but you you will probably find it useful to have this screen shot if you are want to confirm that you are successfully logged into an EC2 Linux instance.

Figure 10: The SSH shell as it appears when you sign on to an AWS server using PuTTY. From this command prompt you can control all the features of the Linux OS. (Click to Enlarge)
You have now finished converting the PEM file to a Putty PPK file.
You can now use the Category | Connection | SSH | Auth | Private key field to associate this key with your Putty session. However, this does not work quite as you hope if you have associated a password (passphrase) with your private key. In fact, I usually leave this field blank, and instead use a tool called Pageant.
Git and Putty
On Windows, we have no built in SSH client. As result, we use a tool called Putty, which is an open source, third party, project.
Step One: Download
Putty comes in two forms:
- A zip file
- A Windows installer
If you are admin on your machine, use the installer, otherwise use the zip file.
Download the zip file or installer from here:
Step Two: Bin Directory
If you are not admin on your machine, you will need to decide where to put Putty. This is really a general issue, and not one limited just to Putty. In particular, we need a place to put executables and scripts that we will run frequently. This could be:
- C:\Users\UserName\Bin
- %USERPROFILE%\Bin
The two lines above are just two ways of saying the same thing. I show them both hoping that at least one of them will make sense to you. Create the Bin directory and put it on your path. Restart your command session.
Step Three: Putty in Bin
If you are not admin on your machine, then put the contents of the Putty zip file in your bin directory. Otherwise, just leave the Putty files where they were installed, but make sure they are on your path.
Create an environment variable called GIT_SSH. It should be set to:
c:\Users\charles.calvert\Bin\PLINK.EXE
You can use the Windows GUI tools for manipulating the environment, or you can try using the built-in SETX utility:
setx GIT_SSH=c:\Users\charles.calvert\Bin\PLINK.EXE
You will probably need to restart the Windows Command Line after making this change. To test your work, echo it from the command line. For instance:
>echo %GIT_SSH%
c:\Users\charles.calvert\Bin\PLINK.EXE
You should also make sure Git.exe is on your path. It can usually be found here. When working with this path, be careful to get the spaces right:
C:\Program Files (x86)\Git\cmd
Also Make sure you enter the following at the command prompt:
git config --global push.default simple
TIP: Consider putting your SSH keys in an encrypted folder.
You might get this error:
Cloning into 'CloudNotes'...
The server's host key is not cached in the registry. You
have no guarantee that the server is the computer you
think it is.
The server's rsa2 key fingerprint is:
ssh-rsa 2048 16:27:ac:a5:76:28:2d:36:63:1b:56:4d:eb:df:a6:48
Connection abandoned.
fatal: Could not read from remote repository.

Please make sure you have the correct access rights
and the repository exists.
Fix it like this:
plink github.com
When they ask you to store the key in the cache, answer yes. Then use CTRL-C to exit the process. (Don’t log in.)
Check the contents of your .gitconfig file:
C:\Users\charles.calvert>type .gitconfig
[gui]
        recentrepo = C:/Users/charles.calvert/Git/JsObjects
        recentrepo = C:/Users/charles.calvert/Git/CloudNotes
[push]
        default = simple
[user]
        email = charlie@elvenware.com
        name = Charlie at A134
Loading a Private Key with Pageant
Pageant is one of the most important tools in the Putty suite of utilities. You can use it to keep your private key and password in memory. You can load this file in the morning when you sign in, and then never have to enter the password again until Pagaent is unloaded from memory. If you simply put your computer to sleep at night, instead of shutting it down, then you can go for days without ever having to think about passwords, Pageant or SSH. Everything will simply work, very securely, without you having to do anything.
Figure 07 shows Pagaent running with two private keys loaded:
[ ][p07]
Figure 07: Using Pagaent. Click to expand.
There are number of ways to load your key into pageant. If pageant is on your path, then you can do something like this:
pageant %USERPROFILE%\Documents\Data\Putty\GitHub.ppk
Of course, the exact path to your private key will likely be different, but the general principles involved should be clear:
pageant <PATH_TO_PRIVATE_KEY>
If you have a DosAlias.bat file, or some similar tool that helps you set up your working environment, you could also add an “alias” to it:
call doskey.exe sshadd=pageant C:\Users\charlie\Documents\Data\Putty\MyKey.ppk
Then you can just type sshadd in order to load your key into Putty
Another alternative is it use the Windows Task Scheduler to start Pageant at System Startup. The first three pages in the Task Scheduler should look like this:
- General Page - No Changes
- Triggers Page - At System Startup
- Actions page, start pageant and pass in the path to your key as an argument
- “C:\Program Files (x86)\PuTTY\pageant.exe”
- C:\Users\charlie\Documents\Data\Putty\Prog219-LastName.ppk
If you are not concerned with Git or similar tools, but want only to start an SSH session to a remote machine, you can also link to your private key directly from PuTTY, as shown in Figure 08.

Figure 08: Browse for your PPK so PuTTY can use it for authentication.
Finally, it is helpful if you have a way to be able to easily check to be sure that pageant is load. It is best if you can see Pageant in the notification area. Start pageant, then go to the do-hickey in the Windows Notification area and set “Show icon and notifications. The Windows Notification Area is usually found at the bottom right of your screen, on the task bar.*
EC2 Cloud Only
Assume that you are on a heavily locked down machine, or perhaps a Chromebook, and want to connect to an EC2 instance. We assume that you can’t install anything: not ssh, not putty, not cygwin – absolutely nothing. All you have is a browser. How do you proceed?
You will need two tools:
- CodeAnywhere
- Secure Shell extension for Chrome
Actually, there are other tools you can use, but these are the ones we are using in this case.
You will also need to know the following commands. The first two are run on CodeAnywhere. The last one is run in the Developer Tools for your Secure Shell web page.
- Convert a private key to public: ssh-keygen -y -f <PRIVATE_KEY> > <PUBLIC_KEY>
- For instance: ssh-keygen -y -f id_rsa > id_rsa.pub
- Give file readonly by owner only: chmod 400 <FILE_NAME>
- For instance: chmod 400 id_rsa
- Clear the .ssh folder from Secure Shell: term_.command.removeDirectory(‘/.ssh/’)
- Details: Open the Developer Tools (F12) for Chrome and enter the command above.
The last command works because secure shell is using the HTML5 file system. It will only work, of course, if you have opened the Developer Tools for the Secure Shell page.
Connecting to EC2 in this way involves several steps, which you can see on this video:
The steps:
- Go to EC2, create your instance
- Save (or upload) the EC2 PEM file to CodeAnywhere
- On CodeAnywhere convert the SSH PEM file to a public file
- Download the PUB file to your machine
- Optionally move your keys to the directory where you save your keys
- Remove the extension from the PEM file
- Fill in the fields of the secure shell and connect
Trouble Shooting the Connectiong to EC2
If you see, “disconnected No supported authentication methods available (server sent public key)” and “using user name Ubuntu server refused our key,” then you might try the following:
First find the key associated with your running instance, as shown in Figure 10a. In this screenshot, you can see that the Key Pair is called Elvenware006.

Figure 10a: Finding the Key Pair for an EC2 instance. (Click image to expand)
- Locate that key (PEM file) on your Windows machine. If you can’t find the key, it will probably be simplest to start over. Create a new instance instance and a new key, and this time be sure that you do not lose your key. Keep it secret! Back it up!
- Run PuttyGen, chooseConversions from the menu,**and convert the PEM key to a PPK file. ChooseSave Private Key,as shown above in Figure 09. When you save the PPK file, it would be wise to give it the same name as the PEM file. For instance, I would name my file **Elvenware006.ppk. ** **
- Run Pageant, right click on it in the taskbar tray, select the Add button. Load in your PPK, as shown above in Figure 07. This is redundant, but you should also load the key into Putty, as shown in Figure 08. Don’t forget to the set Connection | Data to ubuntu, as shown in Figure 10b.

Figure 10b: Set the Auto-login username to ubunut.
By this point, you should have everything set up correctly and should be able to connect.
Secure Copy with pscp
If you want securely copy a file from a Windows machine to Linux box, you can use the Putty utility called pscp (Putty Secure Copy). This is a command line tool. If you want a more GUI driven interactive tool, I recommend Filezilla, which is covered later in this document.
The best way to use pscp is to first set up a Putty connection to a server, and save it. For instance, on my machine I have a connection called WesternSea. I can use this connection to quickly and efficiently open an SSH shell that places me at the command prompt for my Linux instance. But there is more that I can do with that connection. Given this connection, at the command prompt of my Windows machine, I can type the following to copy a file from my Windows box to my Linux box. In the example shown below, the first line is the command, and the second the output generated by the command:
C:\Users\Ch\Temp>pscp MySite.zip charlie@WesternSea:/home/charlie/.
MySite.zip | 75 kB | 75.2 kB/s | ETA: 00:00:00 | 100%
As you can probably surmise, the command copies the file MySite.zip to a Linux box called WesternSea. In particular, the file ends up the /home/charlie directory of the Linux box. Notice that when I copy the file, I specify the name of the user and the name of the Putty connection I have established for the Linux box: charlie@WesternSea. If you were working with an EC2 instance, you would probably use the user ubuntu rather than charlie.
Tools like pscp can be run from batch files. It often makes sense to use pscp in conjunction with another tool such as plink, which allows you to execute a command on the remote machine. Thus, you can first copy a file to the remote machine, then execute a command that acts upon that file. For instance, you can copy a zip file to a remote machine, then use plink to execute a script on the remote machine that unzips the file and copies its content to a specific location.
Here is a simple plink command, which assumes you have a connection called MyConnection all set up in Putty.
plink MyConnection ls
This will give you a listing of your home folder on your Linux box.
If you want to execute a command that requires sudo permissions on the remote machine, do something like this:
plink -t MountainPass sudo cp /home/ubuntu/Temp/Twitter.js /var/www/.
The command above, when run from the Windows command prompt, copies a file on your Linux box from the Temp directory to the /var/www/. directory. If you need to enter a password to run sudo, then the -t argument passed to plink will offer TTY support for that operation. If you don’t include the -t, you may get errors about “no tty present” and/or “no askpass program specified.”
FileZilla
The FileZilla client is free and supports SFTP. It allows you to copy (or mirror) files on your local hard drive to some Linux server that supports SSH and SFTP. EC2 supports these features automatically.
Connecting with FileZilla is a lot like using Putty, but the tool is very powerful when it comes to copying and comparing files. To connect, you will need to know:
- The URL (or IP address) of your Linux box
- Your username and password for the Linux box. (On Ec2, by default, the username is ubuntu.)
To get started choose File | Site Manager (Ctrl-S) from the FileZilla menu. Fill in the dialog with the host, the protocol, the logon type and the user name.:
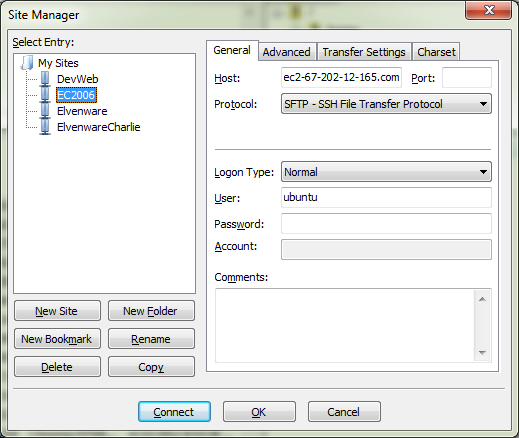
Figure 0X: The FileZilla Site Manager dialog. Fill in the host, the protocol, the logon type and the user name.
If you want, go to the Advanced TAB to set up the location where you want to copy files from and to. Click OK to save your work. Now reload the Site Manager or use the little icon right below the File menu to launch your session. Below you can see an active session with local files on the left, and the files for my EC2 instance on the right.

Figure 0X: FileZilla logged into an EC2 instance running Ubuntu.
Note that I’m copying files to my home folder because I have rights in my home folder. You can right click and chooseupload to copy files.**By default I won’t have rights to create files in the **/var/www folder.
Learn about using queues in FileZilla. Instead of just right-clicking and choosing Upload, in FileZilla, select a group of files, right click, and choose Add to queue. Choose File | Export and save your queue to an XML file stored in a well known location. When you want to copy your files, type Ctrl-P or choose Transfer | Process Queue from the menu. When you want to run the queue again, choose File | Import, retrieve your XML file from your well known location, and then process the queue. The point is that the XML stores your selected files, so that you don’t have to continually select the same group of files and copy them. If this gets old, try the pscp and plink commands.
One of the most useful commands is View | Directory Comparison. You can compare files either by date or by file size. You can use this tool to filter out all the files that are the same on your Windows box and on your Linux box. In other words, it provides a means of seeing only the files that you have updated on your Windows or Linux box, and ignoring all the other files. To see a list of only the files that differ between your selected directories on your Windows and Linux boxes:
- Select View | Directory Comparison | Hide identical files. Make sure the check mark is now set before the Hide identical files option.
-
Choose **View Directory Comparison Enable**, or else choose **Ctrl O**.
The real trick is to memorize the Ctrl | O hotkey (Control - Capital Oh). That will allow you to quickly switch back and forth between normal and selected modes.
Learn more here:
VNC Servers
A VNC server allows you to create a connection between a client machine and the GUI for a server. This is like a Windows Remote Desktop session where you can see the remote desktop and interact with it as you please.
VNC connections have two parts. There is the server, which in our case will typically run on a Linux box. Then there is the client, which displays the remote desktop, and which typically runs on a Windows box. You can, of course, also run a VNC client on a Linux box and indeed that is a common scenario. But in my case, when I use VNC, I am generally on a Windows box and want to see a remote Linux desktop.
On Mint Linux desktop or Ubuntu desktop it is simple to get a VNC server running. On Mint Linux, for instance, choose Application | Internet | Desktop Sharing and share your desktop using VNC.

Figure0X: Setting up the VNC Server on Mint Linux
Then on Windows, I installed the TightVnc client. To attach the client to a TightVNC server, at the TightVNC client prompt type the ip address plus port 5901. If you just want to attach to your Mint Linux desktop, you can leave off the port number. But if you want to use the port number, it looks like this:

Below you can see a screenshot that shows VNC in action. In background I have Mint Linux running on the Windows desktop inside of VirtualBox. The foreground image shows TightVNC displaying the same desktop in an interactive session.

Figure 0X: Mint Linux: VNC in the foreground, VirtualBox in the background.
If you are running Ubuntu server, and particularly if you have a lightweight OpenBox desktop installed, then you might want to install TightVNC on the server so that you can connect to your OpenBox desktop from a Windows machine. Here is the command to install TightVNC server on Ubuntu:
$ sudo apt-get install tightvncserver
And to start the server:
tightvncserver -nolisten tcp :1
On the client side (Windows) I like to run TightVNC Client, as shown above, and this time the 5901 port will probably be needed.

Figure0X: VNC and OpenBox running on Ubuntu Server. Click to enlarge.
When VNC server runs, it create a file called xstartupin a .vnc folder. Here is how I edited the file to get it to run OpenBox:
	charlie@Whitecap:~/.vnc$ cat xstartup
	#!/bin/sh

	# xrdb $HOME/.Xresources
	# xsetroot -solid grey
	# x-terminal-emulator -geometry 80x24+10+10 -ls -title "$VNCDESKTOP Desktop" &
	# x-window-manager &
	# Fix to make GNOME work
	export XKL_XMODMAP_DISABLE=1
	exec ck-launch-session openbox-session
	# /etc/X11/Xsession
	nitrogen --restore
Frankly, I’m not sure all that was necessary, it might have worked correctly out of the box. But I needed to go to the command prompt once in the VNC session and run Nitrogen to get the background setup.