AndroidImageShare
Overview
Our goal in the Android Introductory Pictures assignment is:
- Take a picture of ourselves, or have a friend take our picture
- Upload the picture to Google Drive or some other well known location
- Download the picture and edit it so that only our shoulders, neck and head are visible
- Display the picture in Canvas
NOTE: This assignment is linked to Introductions assignment which requires that you have a good, close up image of your phase to share on Canvas.
Take a Picture
Many phones have two cameras:
- A high quality camera on the back for taking real pictures
- A lower quality camera on the front for taking selfies, or for video calls.
NOTE: The front of the camera is the side with a screen on it, the side that usually faces you. The back of the camera is the side that usually faces away from you, the one without a screen.
There is a [doohickey][dhk] in the upper right of my screen that allows me to switch between the two cameras. In the image shown below, the relevant icon is outlined in red. In the image shown here, I’m using the low quality camera.
 [dhk]:https://support.google.com/googlecamera/?hl=en#6165532
Take a picture of yourself with this camera, or have a friend take a picture of you with the good camera, or do whatever you have to do to get your camera to take a picture of yourself.
Upload the Picture
In the bottom left of the screen, outlined in white, is another doohickey that lets you open the most recently taken picture in a gallery application. Use that tool to open your picture in the gallery.
NOTE: I realize that not everyone has an Android mobile device, and that many Androids have icons and menus that differ from mine. Nevertheless, most phones have equivalent features, and you should learn how to find and use those features.
After opening the picture in your gallery app, you should be able to touch the picture once to bring up a menu. In particular, notice the doohickey that is outlined in red in the image shown below. This is the share icon. Touch it once to bring up a second screen.

Below you see the share screen. It allows you to share your image with yourself or others via any number of applications. I have outlined three in red, since they suite out immediate needs. However, there are other tools for sharing images that you might want to use.

Edit Your Image
Download your image from Google Drive, Dropbox, your email folder, or where ever it was you stored it. Use a paint program to load the the picture so you can edit it.
I want to see a close up your face. I don’t want to see your dog, or your grandfather, or your car. This is not because I don’t like your dog, your grandfather, or your car, but because this exercise is about showing me what you look like.
Edit your picture to focus on your head from your shoulders up.

Now, in this particular picture, I look a little demented, and bit like I have a room temperature IQ. But that’s okay with me, perhaps because I am a bit demented and because I do have a room temperature IQ. It’s just happens to be a very hot room.
My problem, is that this picture is being shown on the internet. The picture that you will share with us in the class will only be shown on Canvas, and only to members of our class. You are safe. Or at least sort of safe.
Upload to Canvas
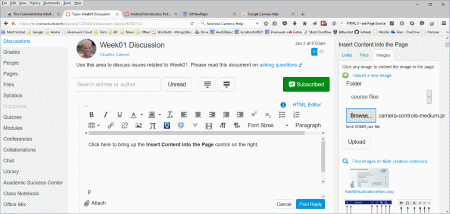
Suppose you have saved the image to Google Drive, downloaded it to your system, and edited it. Now upload it to the discussion area in Canvas. When you start typing a message, a control that will allow you to upload pictures will appear on the right, as shown below.
NOTE: Click on the image shown above to see a larger version of it.
Select the browse button. Navigate to your picture. Now place the cursor in your picture at the point where you want your image to appear. Press the upload button.
Here is an alternative means of uploading images to Canvas:
- Sign in to Canvas
- Click on your name near the upper right of the page.
- Click Files in the menu on the left.
- Optionally create folders with button on right.
- Click the Upload button.
Turn it in
I will see your image in the discussion area, of course. You should also attach your image to this assignment when you submit it. Remember, just attach the raw image. No zip files, no Word documents, just plain old PNG of JPG files.
